
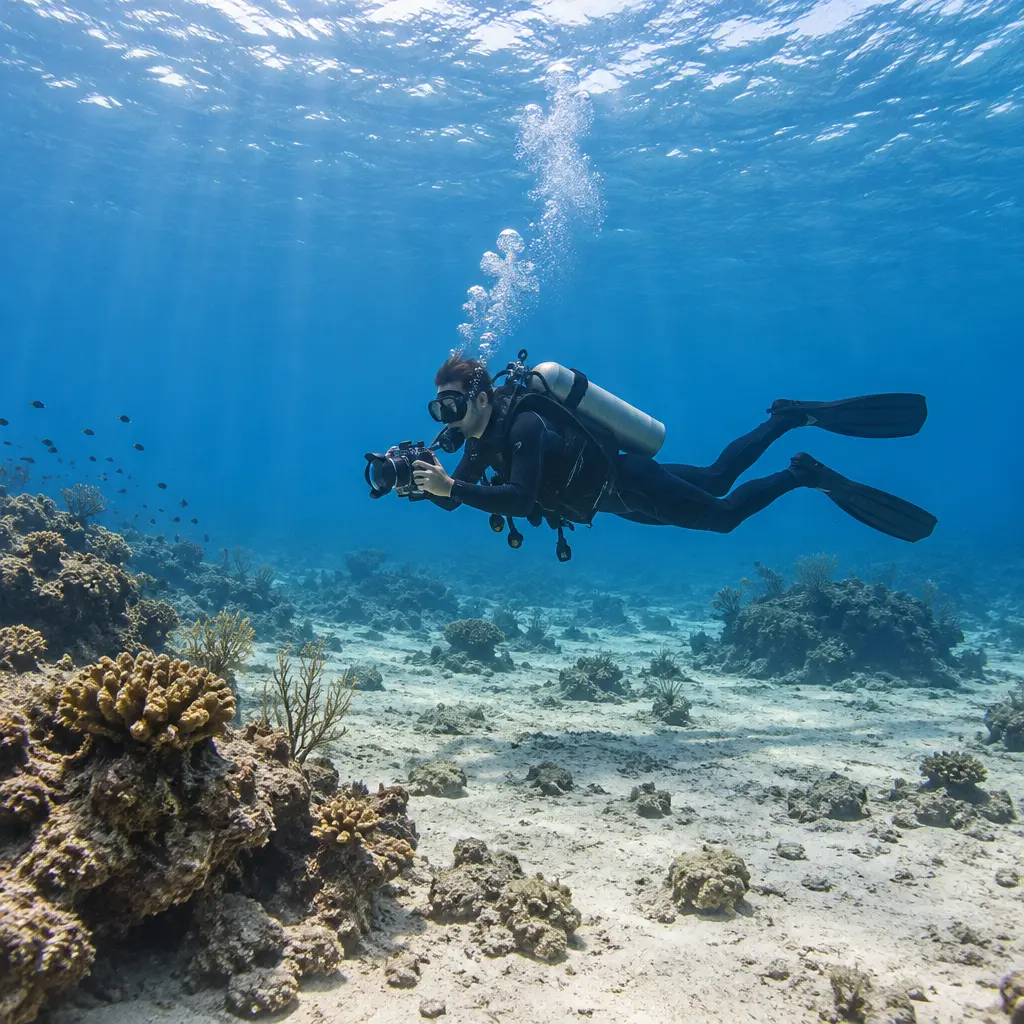
Buoyancy control is a diver’s ability to regulate how high or low they float in water, including the ability to remain nearly motionless at a chosen depth. In underwater photography and videography, that control is the foundation of stable footage: it reduces unwanted vertical movement, helps keep the camera pointed steadily, and limits contact with the seabed. The Professional Association of Diving Instructors (PADI) describes buoyancy control as a core diving skill, while the National Oceanic and Atmospheric Administration (NOAA) emphasizes careful positioning and minimal disturbance when observing underwater environments. Good technique combines weighting, breathing, trim, equipment setup, and camera handling; it matters both for image quality and for protecting fragile habitats.
Regulating Buoyancy Control for Stable Footage
Buoyancy control means managing the balance between a diver’s weight and the upward force exerted by displaced water. Archimedes’ principle explains the underlying physics: an immersed body experiences an upward force equal to the weight of the fluid it displaces. For a camera operator, practical control means being able to pause at a depth without finning continuously, rise or descend gradually, and hold a repeatable body position while framing a shot.
The distinction between neutral buoyancy and steady footage is important. A diver may be neutrally buoyant yet still drift, rotate, or move vertically as breathing changes, currents act on the body, or a camera rig shifts the diver’s balance. Stable images therefore depend on controlling buoyancy and motion together. PADI’s training materials treat buoyancy as a foundational skill, and the NOAA Diving Manual likewise presents buoyancy, weighting, and trim as connected elements of safe, controlled diving.
Neutral buoyancy: holding depth
Neutral buoyancy is the state in which a diver neither rises nor sinks when relaxed and not actively changing depth. Divers adjust buoyancy primarily by adding or releasing gas from a buoyancy compensator device (BCD) and, during scuba diving, by managing their breathing. Small changes matter: inhaling increases lung volume and temporarily increases displacement, while exhaling reduces it. Smooth, unhurried breathing helps prevent the repeated bobbing that can make a shot visibly unstable.
Neutral buoyancy is not a fixed setting for the entire dive. As gas is consumed from a scuba cylinder, the diver becomes lighter; exposure suits also compress as depth increases and expand during ascent. Divers must compensate for those changes rather than make large, hurried BCD adjustments. A useful practice is to check buoyancy at the beginning of a dive under the conditions in which the dive will take place, then make small corrections as needed.
Trim: maintaining a stable body angle
Trim describes the diver’s orientation in the water, including whether the body is level, head-up, or head-down. A level, horizontal position generally presents less frontal area to the water than an upright posture, making it easier to remain still and reducing the temptation to use the hands or fins for constant correction. For filming, consistent trim also helps the camera stay aligned with a subject instead of pitching up and down with the diver.
Trim depends on the placement of weights, the buoyancy characteristics of the exposure suit, tank position, and carried equipment. A camera housing, lights, and arms can change how the diver balances. Rather than compensating with repeated fin strokes, divers can review their equipment configuration in a controlled setting and adjust it with an instructor or experienced dive professional. Any change must preserve appropriate weighting and safe access to equipment.
Weighting: avoiding excess ballast
Weighting is the choice and distribution of ballast needed to offset the buoyancy of the diver, suit, and equipment. Too much weight can force a diver to add more gas to the BCD, increasing buoyancy changes as the suit compresses or expands. It can also make a controlled ascent harder and encourage a feet-down posture. Too little weight, by contrast, can make it difficult to stay submerged safely, especially near the end of a dive when the cylinder is lighter.
A buoyancy check should be performed using the diver’s actual exposure suit and equipment, in suitable conditions, and according to training guidance. PADI recommends that divers refine weighting rather than rely on habitual estimates. For underwater camera work, this check should include the full rig, because a housing and lighting system can materially change the diver’s overall balance. Never remove or relocate required weights simply to improve a shot without confirming that the configuration remains safe.
Once a diver can hold depth and trim, the next challenge is keeping the camera stable without disturbing the water or the environment.
Applying Buoyancy Control to Camera Stability
Camera stability underwater is the combined result of the diver’s position, breathing, fin technique, equipment handling, and the water’s movement. Unlike a tripod on land, a diver is suspended in a moving fluid. Even slight changes in depth or body rotation can shift framing, while fin strokes can stir sediment into the view. The most reliable approach is to stabilize the diver first, then operate the camera with minimal movement.
Breathing and timing a shot
Controlled breathing helps reduce vertical movement because lung volume affects buoyancy. A camera operator can exhale gently and allow the body to settle before recording or taking a still image, rather than holding a breath or making a sudden inhalation. Breath-holding is not an appropriate stabilization method: divers should continue breathing normally and follow their training, particularly when using scuba equipment.
For a short video sequence, it can help to establish position first, wait for breathing and movement to settle, and then begin recording. This is a practical technique rather than a guarantee of motion-free footage; surge, current, and the diver’s own movement can still affect the image. A camera’s stabilization features may help, but they cannot replace good buoyancy and safe positioning.
Finning and avoiding sediment
Finning technique influences both camera motion and environmental impact. Kicking downward near the bottom can lift sand or silt, reducing visibility and creating a cloudy plume in the image. Divers can reduce this risk by maintaining distance from the substrate, moving slowly, and using an appropriate fin technique for the setting. The NOAA Diving Manual and NOAA guidance for underwater activities emphasize minimizing disturbance and avoiding contact with marine life and habitat.
The ecological stakes are real. NOAA notes that coral reefs provide habitat for roughly one-quarter of all marine species, despite occupying a small fraction of the ocean. A photographer who keeps neutral buoyancy and avoids touching or kicking the reef helps protect a complex ecosystem while also preventing debris from obscuring the shot. The same principle applies to shipwrecks, seagrass beds, caves, and freshwater sites: maintain clearance and do not use living or historic features as handholds.
Camera-rig balance and handling
A camera rig is the complete underwater imaging setup, which may include a housing, camera, ports, strobes or video lights, arms, and buoyancy floats. Its weight and balance affect how the diver holds it and can alter trim. A rig that is excessively heavy, positively buoyant, or awkwardly balanced may pull the diver’s arms down or encourage compensating body movements. Before entering the water, check that controls are accessible and that the rig can be held comfortably without sacrificing safe diving posture.
Photographers often adjust rig buoyancy with manufacturer-approved floats or other purpose-designed accessories. Such changes should be tested in a controlled environment, since a rig that rises or sinks unexpectedly can pull on the diver or complicate handling. Keep the camera close to the body when moving, extend it only when composing a shot, and avoid using the housing or its arms to brace against the bottom or reef.
Current, surge, and subject distance
Current is the horizontal movement of water, while surge is the back-and-forth motion often produced by waves. Both can move a diver and camera even when buoyancy is otherwise well controlled. In these conditions, divers should assess whether filming is appropriate, choose a safe position, and avoid fighting the water with forceful movements that waste gas or increase instability. If conditions exceed training or comfort, the safe choice is to stop the attempt and follow the dive plan.
Getting closer to a subject can reduce the amount of water between the lens and the subject, often improving clarity, but proximity must never come at the expense of safe clearance. NOAA’s responsible-diving guidance advises observers to avoid touching or disturbing marine life. A telephoto or macro approach, patient waiting, and careful positioning can produce useful compositions without chasing animals or damaging habitat.
These techniques are most effective when practiced before a critical shoot, using the same exposure protection and camera configuration planned for the dive.
Practicing and Assessing Stable Underwater Footage
Buoyancy skills improve through deliberate practice, not last-minute correction while concentrating on a subject. Divers can first rehearse hovering without a camera, then repeat the exercise with the complete rig in a controlled environment under qualified supervision. The goal is to become comfortable maintaining depth and orientation while keeping hands available for the camera and essential equipment.
A practical pre-shoot routine
- Check the dive plan, conditions, exposure suit, weighting, and camera equipment before entering the water.
- Confirm that the housing is secure and functioning, and that lights, arms, and controls are positioned for comfortable handling.
- At a safe location, establish neutral buoyancy and a stable horizontal trim before framing the subject.
- Pause, breathe normally, and allow movement to settle before recording or taking a still image.
- Maintain clearance from the bottom and wildlife; stop filming if conditions or positioning become unsafe.
- Review the footage afterward for vertical bobbing, rotation, fin-induced sediment, and changes in framing, then practice the specific skill that needs improvement.
What to look for in footage
A simple review can reveal whether instability comes from buoyancy, trim, camera handling, or the environment. Repeated up-and-down motion may indicate changing depth or breathing-related bobbing; a horizon that rolls may point to body rotation or uneven camera support; a sudden haze may result from disturbed sediment. These observations are diagnostic clues, not substitutes for instruction or an evaluation of dive safety.
For a visual comparison, a chart could plot vertical frame displacement over time for footage captured during an unpracticed hover and a practiced hover. The measurement would make movement easier to compare, but the result would depend on camera settings, current, subject distance, and the analysis method. No single stabilization score captures the full quality or safety of a dive.
Real-world application and responsible observation
Underwater researchers, conservation divers, and recreational photographers all benefit from controlled positioning. A survey diver may need to document a site without disturbing organisms or sediment, while a videographer may need to hold a consistent composition long enough to record animal behavior. In each case, neutral buoyancy and careful trim support repeatable observation. NOAA’s underwater research and diving guidance reflects the broader principle that collecting useful information and minimizing environmental disturbance are compatible goals.
The same approach is important around coral reefs. NOAA reports that reefs support about 25 percent of marine species, making avoidable contact consequential beyond the immediate image. A stable diver is less likely to collide with coral, stir sediment over organisms, or damage a fragile feature while trying to correct a shot. The best footage is therefore not simply smooth; it is obtained without compromising the diver, the subject, or the site.
Conclusion: Buoyancy Control Supports Better Footage and Safer Diving
Buoyancy control underpins stable underwater footage because it helps divers hold depth, maintain trim, manage equipment, and limit unnecessary finning. Neutral buoyancy, appropriate weighting, controlled breathing, balanced camera rigs, and awareness of current work together; none is a substitute for the others. These skills also protect marine and historic environments by reducing contact and sediment disturbance.
Before the next underwater shoot, practice hovering with the complete camera setup in conditions appropriate to your training, review the dive plan, and prioritize safe distance over a perfect frame. For further guidance, consult a qualified diving instructor, PADI buoyancy-training materials, and NOAA’s diving and responsible-observation resources.
Sources: National Oceanic and Atmospheric Administration, NOAA Diving Manual, https://www.omao.noaa.gov/ndc/noaa-diving-manual; National Oceanic and Atmospheric Administration, Coral Reef Ecosystems, https://oceanservice.noaa.gov/education/tutorial_corals/coral07_importance.html; National Oceanic and Atmospheric Administration, Responsible Diving, https://oceanservice.noaa.gov/education/tutorial_corals/coral09_protect.html; Professional Association of Diving Instructors, Peak Performance Buoyancy, https://www.padi.com/courses/peak-performance-buoyancy; National Oceanic and Atmospheric Administration, Archimedes’ Principle and Buoyancy, https://oceanservice.noaa.gov/education/tutorial_currents/04currents2.html


